
All my servers are running on VMware Worstation virtual machines. Virtual machines have the advantages of easy management and ability of restoring to earlier snapshots, which are quite valuable during development.
Some of my virtual machines need to be running all the time when the physical computer is on. VMware Workstation provides an AutoStart feature to allow shared virtual machines to automatically start during the host system boot-up. However, the built-in AutoStart feature turns out to have limitations which make it useless for my situation.
What's Wrong with AutoStart?
There are 2 major problems with VMware Workstation's implementation of AutoStart feature that made me to seek for an alternative solution:
- Only shared virtual machines can be auto started. This in itself is not a problem. You just have to set your virtual machines to be shared. and then configure AutoStart. But, there are restrictions placed on shared virtual machines. One of them is that you can't use physical disks with shared VMs. Since one of my VMs uses physical disks, it can't be made shared, let alone AutoStart.
- Another problem was discovered when I noticed MySQL server on an AutoStart VM had to recover from corruption every time the host computer was restarted. I thought the AutoStart feature would also auto-shutdown/suspend VMs when the host is shutting down or rebooting, and apparently I thought wrong. The feature only does its name implies, which is auto starting VMs. That is simply unacceptable to allow possible data loss.
An Alternative Way to Auto Start/Stop VMs
Here I will present the script and procedure I devised to allow VMs with physical disks to automatically start when the host boots up and suspend/shutdown when the host shuts down. All these are done using existing software already installed with VMware Workstation and on a Windows 7 Home Premium system.
The script I wrote is in PowerShell. There is no special reason for using PowerShell. I only used it just for fun, and are not very good with it. You are welcome to modify it and make it better. To control VMs, I use the 'vmrun.exe' program came with VMware Workstation.
Once I had the script working as desired, I needed a way to run it during the host system starting up and shutting down. There are maybe 3 different ways to achieve that on a Windows 7 system. However, I found using the Task Scheduler may be the simplest and universal approach.
Then, I set up my VMs to allow my auto start/stop script to process, and tested it on the host system. At the end I have a satisfactory way to let my VMs start and suspend automatically.
The Auto Start/Stop Script
The following PowerShell script is for starting and stopping VMs, which will be called by the Task Scheduler at specific events. Some variables at the beginning of the script must be set according to how your host system is set up.
- $vmrun_path: the full path of the VMrun.exe program location.
- $auto_vms_path: the full path of the folder containing your virtual machines.
- $start_delay: how many seconds delay between starting VMs.
- $stop_delay: how many seconds delay between stopping or suspending VMs.
The function Get-AutoVMs is one of the primary work horses in this script. It finds all the VMs which should be controlled in the location specified by $auto_vms_path, and return them in a sorted order according to the +autovm.nn (where nn is the starting order number) filename in each VM's folder.
For example, a VM with a file +autovm.03 in its folder will start before a VM with a file +autovm.05. The stopping/suspending order will be exactly the reverse of the starting sequence. To disable a VM from auto starting/stopping, you simply delete the +autovm.nn file or change it to something like -autovm.nn, for instance.
The parts of script that does actual work to control VMs are the 2 foreach loops, one for starting them and the other for stopping/suspending them. The program VMrun.exe is utilized in those loops. To start a VM, the code
& "$vmrun_path" -T ws start "$vm" nogui
is used where nogui is specified because it will run at background without a GUI. For stopping and suspending a VM, the script uses
& "$vmrun_path" -T ws $command "$vm" $option
where $command can be 'stop' or 'suspend' and $option can be 'hard' or 'soft'. With option 'soft', VMware will ask the guest system to run corresponding script first. With option 'hard', the guest system will not be given a chance to run its script.
# Get script arguments
# $command: start, stop or suspend
# $option: hard or soft when $command is stop or suspend
param ([string] $command, [string] $option = "soft")

## defaults
# location of vmrun.exe
$vmrun_path = "${Env:ProgramFiles(x86)}\VMware\VMware VIX\VMrun.exe"
# location of virtual machine directory
$auto_vms_path = "E:\Virtual Machines"
# delay interval (in seconds) for starting up and stopping VMs
$start_delay = 90
$stop_delay = 30

## functions
# Get VMs to be auto-started at $path sorted by +autovms.xx name.
function Get-AutoVMs($path) {
    Get-ChildItem "$path\*\+autovm.*" | Sort-Object Name `
    | ForEach-Object {$_.DirectoryName+"\*.vmx"} | Get-ChildItem `
    | ForEach-Object {$_.FullName}
}

# Get running VMs
# NOTE: this only works this VMs started in the same session, so we can't use it here.
function Get-RunningVMs() {
    & "$vmrun_path" -T ws list | Where-Object {$_.EndsWith(".vmx")} `
    | Sort-Object -Descending
}

## main program
if ($command.ToLower() -eq "start") {
    # Retrieve VMs to be auto-start
    $auto_vms = @(Get-AutoVMs $auto_vms_path)

    # Start each VM in the list
    foreach ($vm in $auto_vms) {
        & "$vmrun_path" -T ws start "$vm" nogui
        # Delay a little while.
        if ($vm -ne $auto_vms[-1])
            { Start-Sleep -Seconds $start_delay }
    }

    exit 10

} elseif ((("stop", "suspend") -contains $command.ToLower()) `
         -and (("soft", "hard") -contains $option.ToLower())) {
    # Retrieve VMs, and reverse its order.
    #$auto_vms = @(Get-RunningVMs)
    $auto_vms = @(Get-AutoVMs $auto_vms_path)
    [Array]::Reverse($auto_vms)

    # Suspend each VM in the running list.
    foreach ($vm in $auto_vms) {
        & "$vmrun_path" -T ws $command "$vm" $option
        # Delay a little while.
        if ($vm -ne $auto_vms[-1])
            { Start-Sleep -Seconds $stop_delay }
    }

    exit 20
}

exit 1
Allow the Script to Execute
After you saved the script to your computer and tried to execute it, you will find out that you are not allowed to run it. That is because the default ExecutionPolicy on Windwos 7 is to restrict all PowerShell scripts. You will have to change the ExecutionPolicy to allow an administrator account to execute local PowerShell Scripts. That administrator account will also be the one under which the Task Scheduler action will be run.
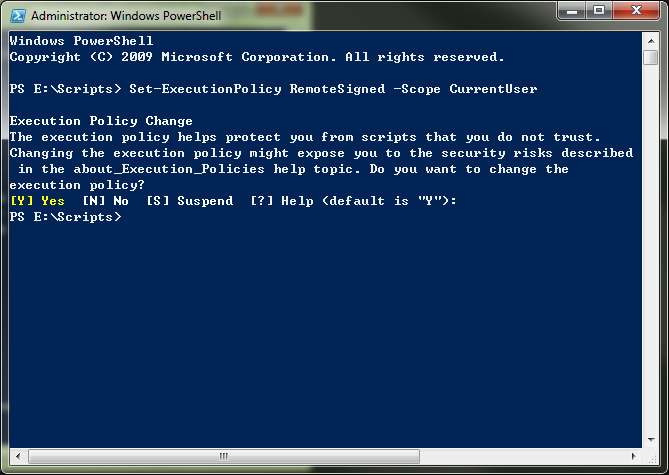
First, find Windows Powershell in Start Menu -> All Programs -> Accessories -> Windows Powershell. Right click on it and use 'Run as administrator' if you didn't sign in with an admnistrator account. Enter this command
Set-ExecutionPolicy RemoteSigned -Scope CurrentUser
at the prompt (as shown in PIC-1). That will allow the administrator account to execute local and signed remote PowerShell scripts.
Schedule Tasks in Task Scheduler
With auto start/stop scripts ready, it's time to set up 2 tasks in Task Scheduler to start VMs when the host system is booting up and stop them when the host is shutting down. There are other possible approaches, but using Task Scheduler may be the simplest way on Windows 7 Home Premium.
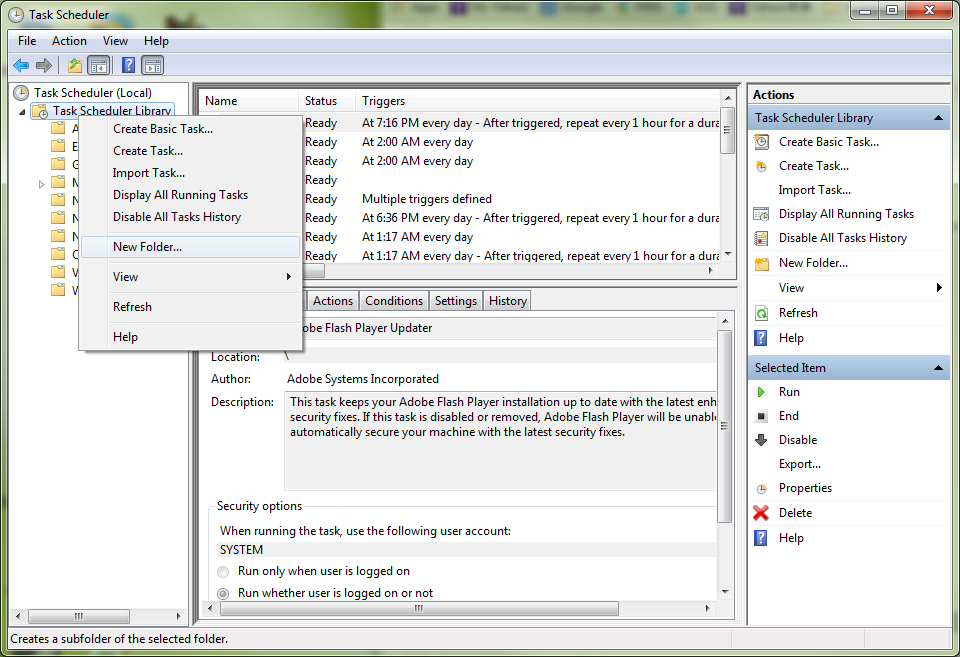
Task Scheduler can be find in Start Menu -> All Programs -> Accessories -> System Tools. Right click on it and select 'Run as administrator' to run it using the same adminsitrator account you like to run the script. In the left pane of Task Scheduler window, select 'Task Scheduler Library' and right click on it. Select 'New Folder...' to create a folder, e.g. VMware. The 2 tasks will be placed inside that folder. (See PIC-2.)
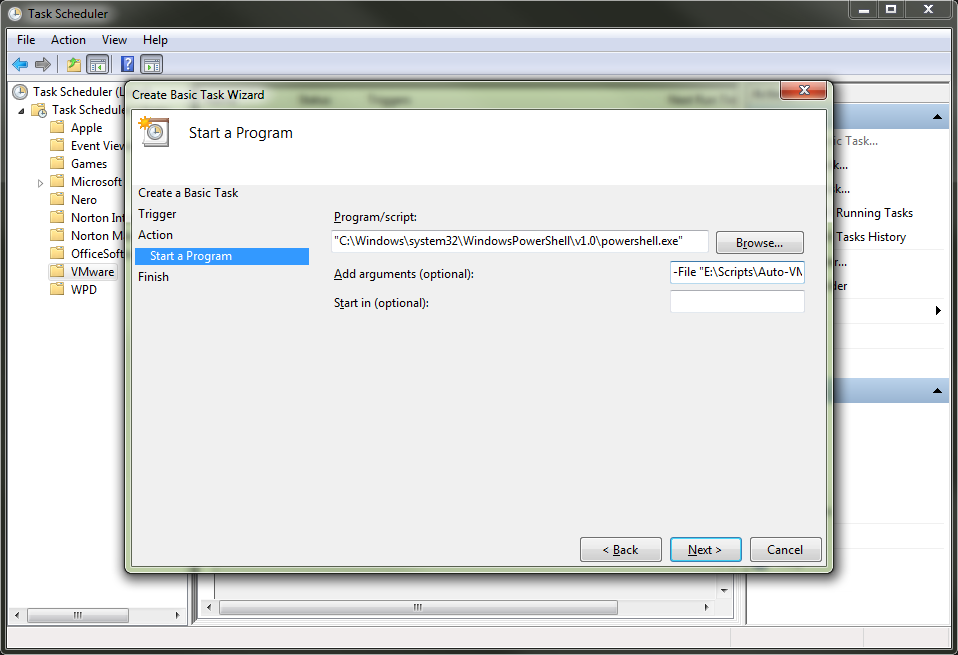
To create a task for starting VMs, right click on the new folder and select 'Create Basic Task...'. Give it a name and description. Select 'When the computer starts' for Trigger and 'Start a program' for Action. When asked for a Program/script, enter 'C:\Windows\system32\WindowsPowerShell\v1.0\powershell.exe' into the entry filed. (Please adjust according to your PowerShell location.) In the Add arguments (optional) field, enter '-File "E:\Scripts\Auto-VMs.ps1" start'. (Replace the script path and name with the one you use.) (See PIC-3.)
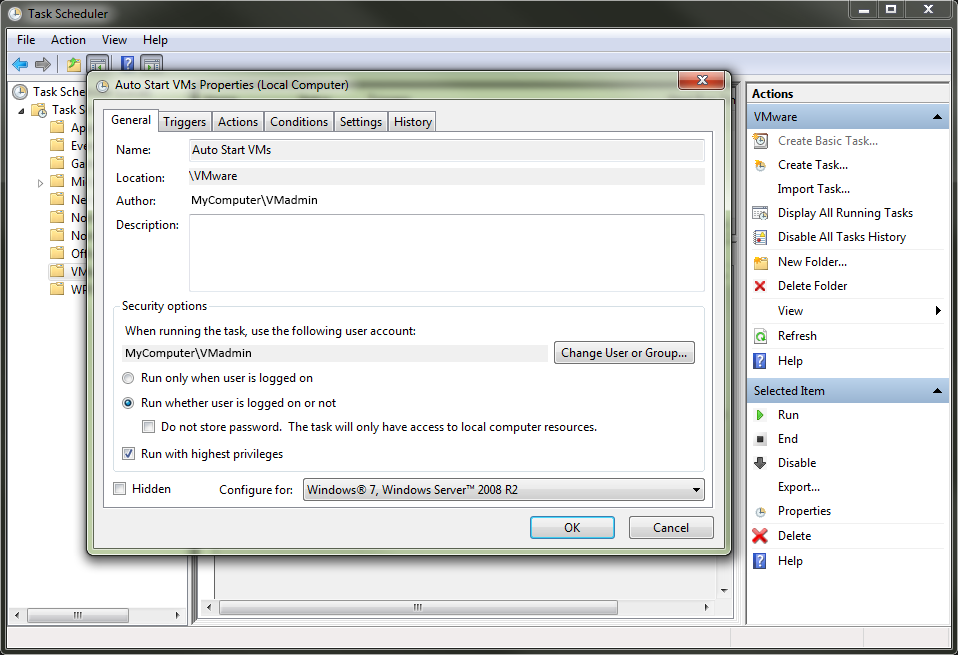
At the Summary step, please check the box 'Open the Properties dialog for this task when I click Finish' before click on Finish button. The task's Properties window will show up to continue the configuration. On the Properties window, please check the user account to run the script is correct, then select 'Run whether user is logged on or not' and check the box 'Run with highest privileges'. Also make sure the Configure for selection box has 'Windows 7, Windows Server 2008 R2'. You will need to enter the password of the admisntrator account for running the script after you click on the OK button. (See PIC-4.)
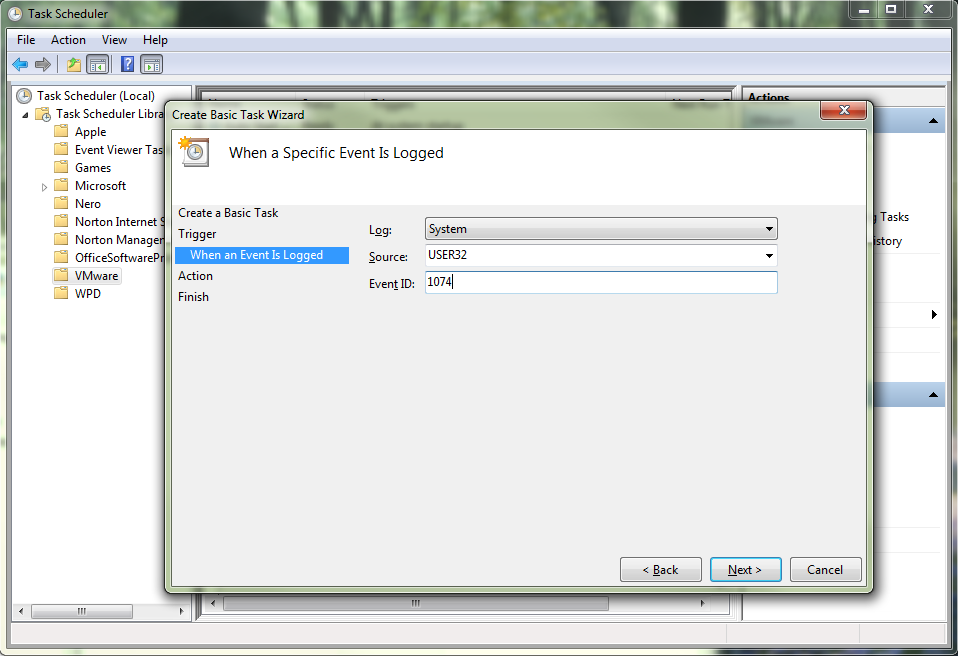
Repeat the same process to create a task for stopping/suspending VMs. But this time, when asked for Trigger, select 'When a specific event is logged'. Then, for Log and Source dropdown lists choose 'System' and 'USER32', respectively. In Event ID field, enter '1074' which is the event logged when a shutdown is initiated. (See PIC-5.)
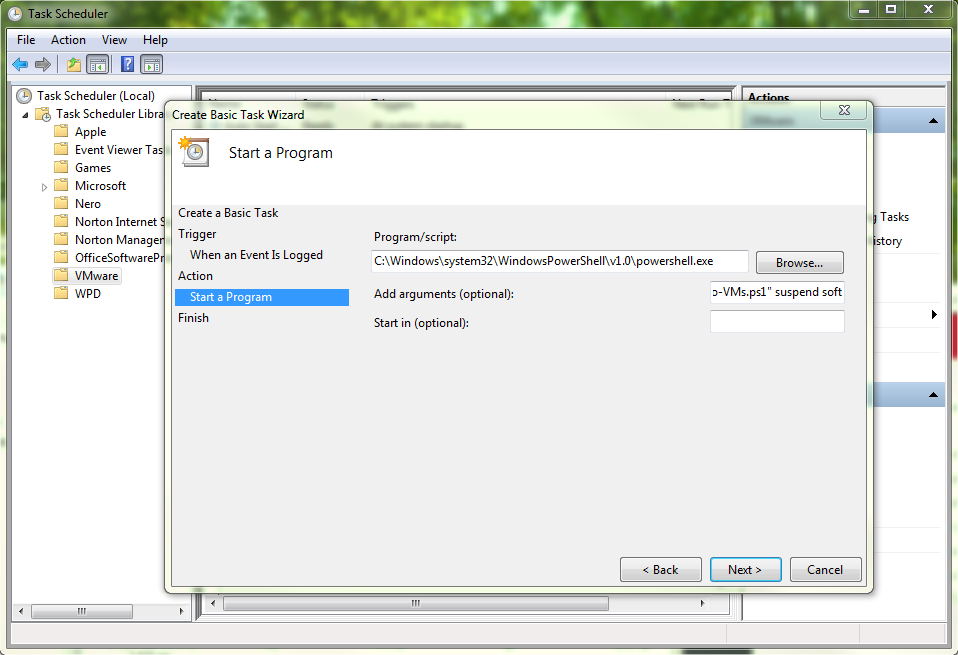
Again, select 'Start a program' for Action, and when asked for a Program/script, enter 'C:\Windows\system32\WindowsPowerShell\v1.0\powershell.exe' into the entry filed (with adjustments according to your PowerShell location). In the Add arguments (optional) field, enter '-File "E:\Scripts\Auto-VMs.ps1" suspend soft'. (Replace the script path and name with the one you use.) You can also use 'suspend hard', 'stop soft' or 'stop hard' as arguments to the script. (See PIC-6.)
Finally do the same thing as before for the Summary page and the subsequent Properties window. Now you have 2 tasks setup to automatically start and stop/suspend virtual machines during the host system's startup and shutdown.
Configure Virtual Machines and Test
We now have to create +autovm.nn files for those virtual machines to be controlled by the scheduled tasks. Simply place an empty file named +autovm.nn in the folder of the virtual machine, where nn is a 2-digit number used to determine that virtual machine's starting order. For instance, the first virtual machine to be started may have a file +autovm.01 in its folder. Please remember the stopping/suspending order is the reverse of the starting order.
To test the tasks, please open Task Scheduler again and go to the folder you created earlier. First, select the task which starts VMs, and click on Run from the menu in the right pane. Use your VMware Workstation under the adminsitrator account specified earlier to check whether those virtual machines are indeed started. If they are started as planned, you can select the stopping task and again click on Run in the right pane to stop/suspend them. Check with VMware Workstation to see they are indeed stopped/suspended.
If everything works as expected, you should restart the host system twice to make sure those scheduled tasks start/stop virtual machines during host startup and shutdown. Go through the procedure if something not working as planned.